
Looking for an easy and affordable way to upgrade your kitchen? Installing a peel and stick backsplash is one of the quickest DIY projects you can do. Not only does it add a modern touch to your space, but it also doesn’t require professional installation or special tools. Whether you’re a seasoned DIY enthusiast or a first-timer, this guide will walk you through everything you need to know about how to install peel and stick backsplash in your kitchen.
What is a Peel and Stick Backsplash?
A peel and stick backsplash is a DIY-friendly wall covering that mimics the look of traditional tiles, but with an easy adhesive backing that requires no grout or special installation tools. They are made of materials such as vinyl, glass, or even stone, designed for fast installation and durability. The best part? They are budget-friendly, customizable, and can be easily removed without damaging your walls.
Why Should You Install a Peel & Stick Backsplash?
Peel and stick backsplash tiles are the perfect solution for homeowners looking to refresh their kitchen without breaking the bank. Here’s why:
- Cost-Effective: Traditional tile installation requires professional help, which can get pricey. Peel and stick backsplashes allow you to do it yourself, saving money on labor costs.
- Time-Saving: Unlike traditional tile installation, peel and stick tiles don’t require grout or complicated cutting, making the installation process a breeze.
- Stylish & Customizable: Available in a wide range of colors, patterns, and finishes, you can find the perfect design to match your kitchen style.
- Minimal Cleanup: No mess, no hassle. Once installed, there’s no need for cleaning grout lines or tools.
How to Install Peel & Stick Backsplash in Your Kitchen?
What Are the Tools You Need for Installation?
Before you start, gather these tools to ensure a smooth and successful installation:
- Peel and stick backsplash tiles (enough for your entire wall space)
- Measuring tape
- Utility knife or scissors
- Level
- Ruler or straight edge
- Pencil or chalk for marking
- Cleaning supplies (e.g., mild detergent and a cloth)
How Do You Prepare the Wall for Installation?
Proper wall preparation is key to ensuring your backsplash adheres properly and stays in place for years. Here’s how:
- Clean the Surface: Thoroughly clean the wall where you plan to install the backsplash. Use a mild detergent and water to remove any grease, dirt, or grime. Dry the area completely before moving forward.
- Measure and Mark: Measure the height and width of the area you want to cover. Use a pencil to mark your starting point, which is typically the center of the wall or directly above your countertop.
- Ensure a Smooth Surface: If the wall has any bumps or uneven spots, sand them down to create a smooth, even surface for better adhesion.
How Do You Install Peel & Stick Backsplash Tiles?
Now it’s time to get started with the installation. Follow these steps:
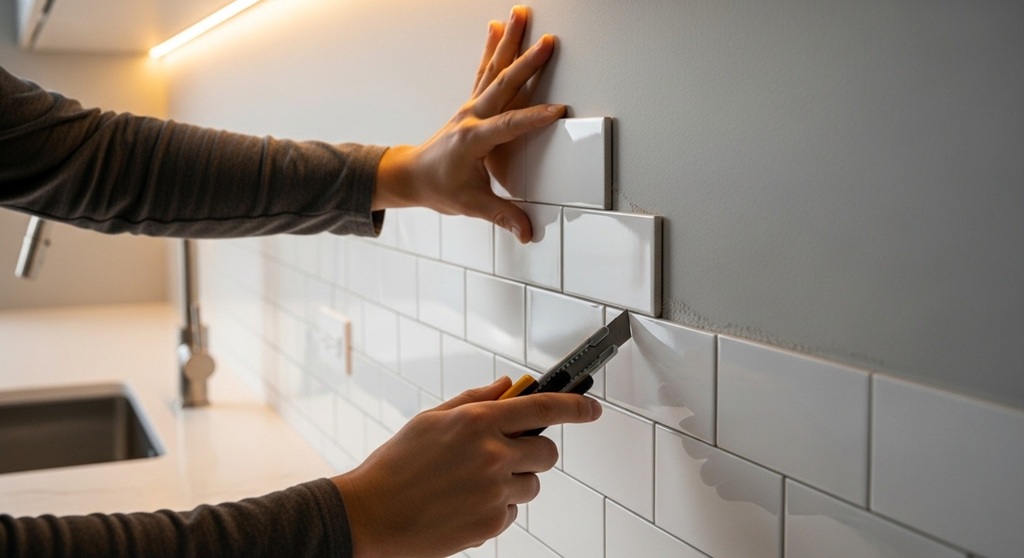
- Peel the Backing: Start by peeling the backing off the first tile. Begin at the corner or edge of your marked starting line.
- Place the Tile: Align the tile with the marked starting line and press it firmly against the wall. Use a level to ensure the tile is straight and evenly placed.
- Continue Applying Tiles: Once the first tile is in place, continue peeling and sticking the tiles in a row, making sure to align them edge-to-edge. If necessary, use a utility knife to trim tiles to fit around edges, outlets, or corners.
- Check Alignment: As you install each row, use a level to check that the tiles remain straight and aligned. This ensures a clean and professional-looking finish.
- Press and Seal: Once all the tiles are in place, use a soft cloth to press down on the entire surface, ensuring that all tiles are firmly adhered to the wall.
How Do You Cut Peel & Stick Backsplash Tiles?
In most cases, you’ll need to cut tiles to fit around corners, outlets, or edges. Here’s how:
- Mark the Tile: Use a pencil or chalk to mark where you need to make the cut.
- Cut Carefully: Use a utility knife to score the tile along your marked line. For straight cuts, use a ruler or straight edge to guide the knife.
- Trim Around Obstacles: If you need to cut around outlets, cabinets, or corners, carefully measure the space and trim the tile to fit. If needed, use scissors for vinyl-based tiles for smoother cuts.
How Do You Finish the Installation?
Once you’ve installed all the tiles, it’s time to complete the job:
- Clean the Edges: Wipe down the edges of the backsplash to remove any adhesive residue.
- Apply Caulk (Optional): For a polished look, apply caulk along the edges of your backsplash where it meets the countertop or ceiling. This helps to seal the edges and gives a clean finish.
- Allow to Set: Let the tiles set for at least 24 hours before exposing them to moisture or heavy use to ensure proper adhesion.
What Are the Benefits of Peel & Stick Backsplashes?
Peel and stick backsplashes offer several advantages, including:
- Affordability: Compared to traditional tile, peel and stick tiles are much cheaper, making them an ideal choice for budget-conscious homeowners.
- Easy Installation: No need for professional installation. The peel-and-stick adhesive backing allows you to install the tiles yourself with minimal effort.
- Variety of Designs: With a wide range of patterns, textures, and colors, you can easily match your backsplash to your kitchen’s theme.
- Low Maintenance: These backsplashes are easy to clean, requiring just a wipe-down with a damp cloth, and they don’t need sealing like traditional grout-tiled backsplashes.
How Long Will a Peel & Stick Backsplash Last?
Peel and stick backsplashes are designed for durability, but their lifespan depends on several factors:
- Material: Tiles made from vinyl tend to last longer than those made from paper or other lightweight materials.
- Installation Quality: Proper installation, including cleaning the wall and ensuring the tiles are level, will extend the lifespan of the backsplash.
- Maintenance: Regular cleaning and avoiding excessive heat or moisture exposure can help maintain the backsplash for years to come.
Conclusion
Installing a peel and stick backsplash in your kitchen is a fast and affordable way to enhance the aesthetic of your space. With minimal tools and skills, you can achieve a professional-looking result that’s both functional and stylish. By following the easy steps outlined in this guide, you’ll have your kitchen looking like new in no time. Ready to give your kitchen a makeover? Start today and enjoy the transformation!
Frequently Asked Questions (FAQs)
1. Can I install peel and stick backsplash on painted walls?
Yes, as long as the paint is smooth and well-maintained. Ensure the surface is clean and free of any peeling paint or debris before applying the tiles.
2. How do I remove a peel and stick backsplash?
To remove, gently peel back the tiles starting from one corner. If necessary, use a hairdryer to warm the adhesive and loosen it. Be cautious not to damage the wall underneath.
3. How do I clean peel and stick backsplash tiles?
Use a damp cloth and mild detergent to wipe down the tiles. Avoid abrasive cleaners that can scratch the surface or damage the adhesive.
4. Can I use peel and stick backsplash behind a stove?
It’s not recommended to use peel and stick tiles directly behind a stove or any area with high heat. Look for heat-resistant materials or avoid these zones for safety.
5. How do I prevent gaps between peel and stick tiles?
Ensure proper alignment while installing and use a level to keep the tiles straight. If necessary, trim tiles to fit snugly in place to avoid gaps.
Read More Also: 7 Common Sippy Cup Mistakes Parents Should Avoid
Find out: How Measuring Pull Tape Improves Electrical Installation Accuracy